
As an AI solutions technician who spends 40+ hours a week debugging enterprise AI deployments, I’ll let you in on a secret: you don’t need a $10,000 server farm or a monthly ChatGPT Plus subscription to run a powerful chat AI at home. Over the past 6 months, I’ve built and tested half a dozen local AI setups on consumer hardware, and I’m here to show you exactly how to setup your own local chat AI in under 30 minutes—no PhD required.
I started building local AIs for one simple reason: privacy. I got tired of worrying about sensitive work notes, personal projects, or family information being uploaded to cloud servers. With a local AI, everything stays on your PC. No data leaves your machine, no one can read your conversations, and you can use it completely offline. Plus, it’s 100% free after the initial hardware investment.

What You’ll Need: Hardware Breakdown
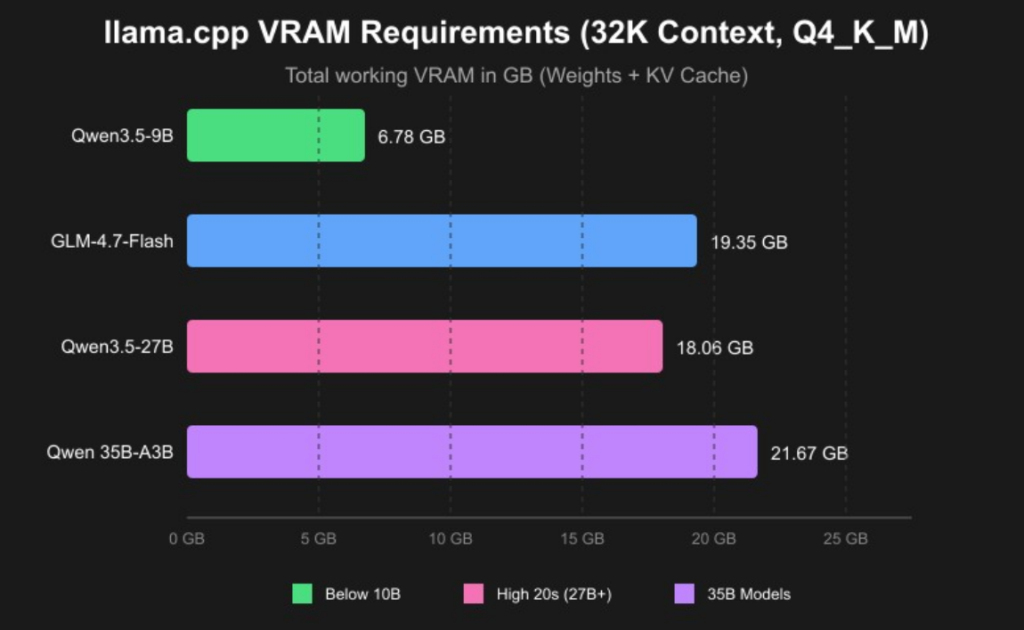
The good news is that modern consumer GPUs are more than capable of running state-of-the-art chat models. Below is the hardware tier breakdown I recommend based on my own testing, paired with the latest VRAM requirements for popular 2026 models:
Figure 1: 2026 Local LLM VRAM Requirements (Q4_K_M Quantization, 32K Context)
Based on these requirements, here are my tiered recommendations for different use cases:
-
- Entry Level (Budget Build): 16GB DDR4 RAM + any modern CPU (Intel i5-12400 or AMD Ryzen 5 5600). You can run 7B-8B parameter models in 4-bit quantized mode entirely in RAM. Inference speed will be around 5-10 tokens per second—fast enough for casual use.
-
- Mid Range (Sweet Spot): 16GB DDR5 RAM + NVIDIA RTX 3060 12GB / RTX 4060 Ti 16GB. This is what I recommend for most people. You can run 8B models at 30+ tokens per second, or even 70B models in 4-bit quantized mode. This setup handles coding, writing, and complex reasoning with ease.
-
- High End (Power User): 32GB DDR5 RAM + NVIDIA RTX 4070 Super 12GB / RTX 4080 16GB. With this, you can run 70B models at 20+ tokens per second, or multiple 8B models simultaneously. Perfect for developers, writers, or anyone who wants the best possible performance.
A quick note: NVIDIA GPUs are still the best choice for local AI because of their superior CUDA support. AMD GPUs work with some tools, but you’ll run into more compatibility issues. For laptops, look for models with at least 16GB of unified RAM and an RTX 4050 or higher.
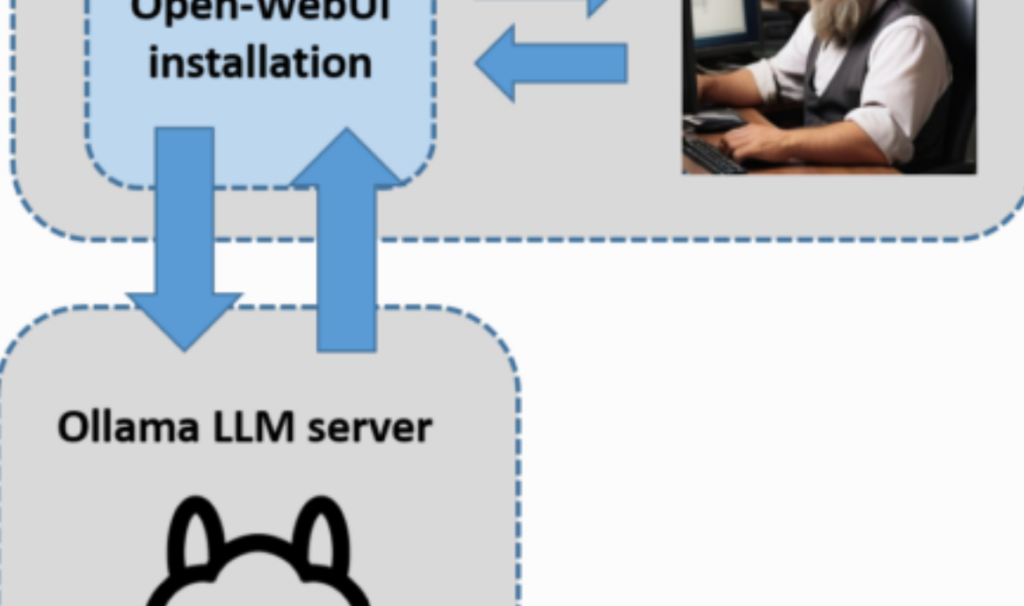
The Simplest Software Stack: Ollama + Open WebUI
To build a seamless local chat AI experience without dealing with complex coding, you need the right combination of tools.
Forget about complex Docker setups, Python dependency hell, or compiling models from source. The easiest way to run a local AI today is using Ollama as your backend and Open WebUI as your frontend. This combination works out of the box on Windows, macOS, and Linux.
Ollama is a lightweight tool that handles all the messy parts of running AI models: model downloading, quantization, GPU acceleration, and inference. Open WebUI is a beautiful, feature-rich web interface that looks and works just like ChatGPT. It supports chat history, multiple models, custom prompts, and even file uploads.
Figure 2: Ollama + Open WebUI Software Stack Architecture
Step-by-Step Setup Guide
I’ve walked dozens of colleagues through this process, and most people finish in under 20 minutes. Here’s exactly what to do:
-
- Install Ollama: Go to ollama.com and download the installer for your operating system. Run the installer, and it will set everything up automatically.
-
- Pull your first model: Open a terminal or command prompt and type
ollama run llama3. This will download the Llama 3 8B Instruct model (about 4.7GB for the 4-bit quantized version) and start it up.
- Pull your first model: Open a terminal or command prompt and type
-
- Test it out: Once the model is downloaded, you can start chatting directly in the terminal. Try asking it a simple question like “Explain quantum computing in simple terms” to make sure it’s working.
-
- Install Open WebUI: The terminal interface is fine for testing, but you’ll want a proper web UI. Open a new terminal and run
docker run -d -p 3000:3000 -v open-webui:/app/backend/data --add-host=host.docker.internal:host-gateway ghcr.io/open-webui/open-webui:main.
- Install Open WebUI: The terminal interface is fine for testing, but you’ll want a proper web UI. Open a new terminal and run
-
- Access the UI: Open your browser and go to
http://localhost:3000. Create an admin account, and you’ll see the ChatGPT-like interface. Ollama will be automatically detected, and you can select Llama 3 from the model dropdown.
- Access the UI: Open your browser and go to
That’s it! You now have a fully functional chat AI running entirely on your home PC.
Pro Tips for Better Performance
After running local AIs for months, here are the tricks that make the biggest difference:
-
- Always use quantized models: 4-bit quantization reduces VRAM usage by 75% with almost no noticeable loss in quality. Ollama automatically uses 4-bit quantized models by default.
-
- Adjust the context window: Most models default to a 4k or 8k context window. If you need to process longer documents, you can increase it by adding
--ctx-size 16384to your Ollama run command. Just note that this will use more VRAM.
- Adjust the context window: Most models default to a 4k or 8k context window. If you need to process longer documents, you can increase it by adding
-
- Try different models: Llama 3 is great, but there are hundreds of specialized models available. For coding, try
ollama run deepseek-coder:6.7b-instruct. For creative writing, tryollama run mistral:7b-instruct-v0.3.
- Try different models: Llama 3 is great, but there are hundreds of specialized models available. For coding, try
-
- Update regularly: Ollama and Open WebUI release updates every few weeks with performance improvements and new features. Run
ollama upgradeto update Ollama, and pull the latest Docker image for Open WebUI.
- Update regularly: Ollama and Open WebUI release updates every few weeks with performance improvements and new features. Run
Common Pitfalls & Fixes
-
- Model is too slow: If you’re getting less than 10 tokens per second, make sure Ollama is using your GPU. Run
ollama psto check. If it says “CPU” instead of “GPU”, you may need to update your NVIDIA drivers.
- Model is too slow: If you’re getting less than 10 tokens per second, make sure Ollama is using your GPU. Run
-
- Out of memory errors: If you get an out of memory error, try a smaller model or a higher quantization level. For example, if Llama 3 8B is too big, try Llama 3 8B Q2_K which uses only 2.7GB of VRAM.
-
- WebUI can’t connect to Ollama: Make sure Ollama is running in the background. On Windows, check the system tray. On macOS and Linux, run
ollama serveto start the server.
- WebUI can’t connect to Ollama: Make sure Ollama is running in the background. On Windows, check the system tray. On macOS and Linux, run
What’s Next?
Once you have your basic local chat AI running smoothly, the possibilities are endless.
Once you have your basic setup running, the possibilities are endless. You can fine-tune models on your own data to create a personal AI assistant, add plugins for web search and file analysis, or even run multiple models side by side. I’ve even set up my local AI to control my smart home devices and automate my morning routine.
Building a local chat AI is easier than you think, and it’s incredibly rewarding. Not only do you get full privacy and control, but you also learn a lot about how AI actually works under the hood. Give it a try this weekend—you’ll be amazed at what you can do with a regular home PC and a little bit of time.
If you want to optimize your system further or explore more tech guides, feel free to visit our Technology Post hub.